Raynox 250 – Everything You Need To Know!

Let’s be honest—getting super close to tiny subjects and seeing all the fine details is just awesome, right? That’s exactly what the Raynox 250 lets you do. The Raynox 250 is a high-quality macro lens attachment that transforms your regular lens into a powerful close-up tool without breaking the bank. Whether you’re a beginner or a seasoned photographer, the Raynox 250 can unlock a whole new world of macro photography for you.
The Raynox 250 is a powerful and affordable macro lens attachment that clips onto your camera lens, offering impressive close-up shots. It’s perfect for beginners and hobbyists looking to explore the world of macro photography with ease.
So why is everyone talking about the Raynox 250? Simple—it’s affordable, portable, easy to use, and delivers pro-level results. That’s why it’s become a go-to option for hobbyists and professionals alike who want to dip into macro photography without investing in an expensive dedicated macro lens.
Understanding Macro Photography!
1. What is Macro Photography?
Macro photography is all about capturing tiny things in life—bugs, flowers, textures, even water droplets—and making them look huge. We’re talking about photos that reveal details you can’t even see with the naked eye. Cool, right?
2. Why You Need a Macro Lens Attachment:
Not everyone can afford a $1000+ macro lens. That’s where the Raynox 250 steps in. It attaches to your regular lens and instantly turns it into a macro beast. With the Raynox 250, you can get extreme close-ups with just a snap-on filter.
3. Benefits of Using the Raynox 250 for Macro:
The Raynox 250 gives you razor-sharp detail, works with multiple lenses, and it’s super compact—perfect for travel. Plus, it fits right into your pocket.
How the Raynox 250 Works?
The Raynox 250 works by making your camera lens focus much closer than it normally can. This lets you take detailed close-up photos of small things, almost like turning your regular lens into a mini microscope. It increases the magnification by reducing the minimum distance your lens needs to focus. That means you can get much nearer to your subject and still keep everything sharp and clear. It’s a simple way to explore the tiny details in the world around you, perfect for macro photography like capturing insects, flowers, textures, or anything small that you want to show up close.

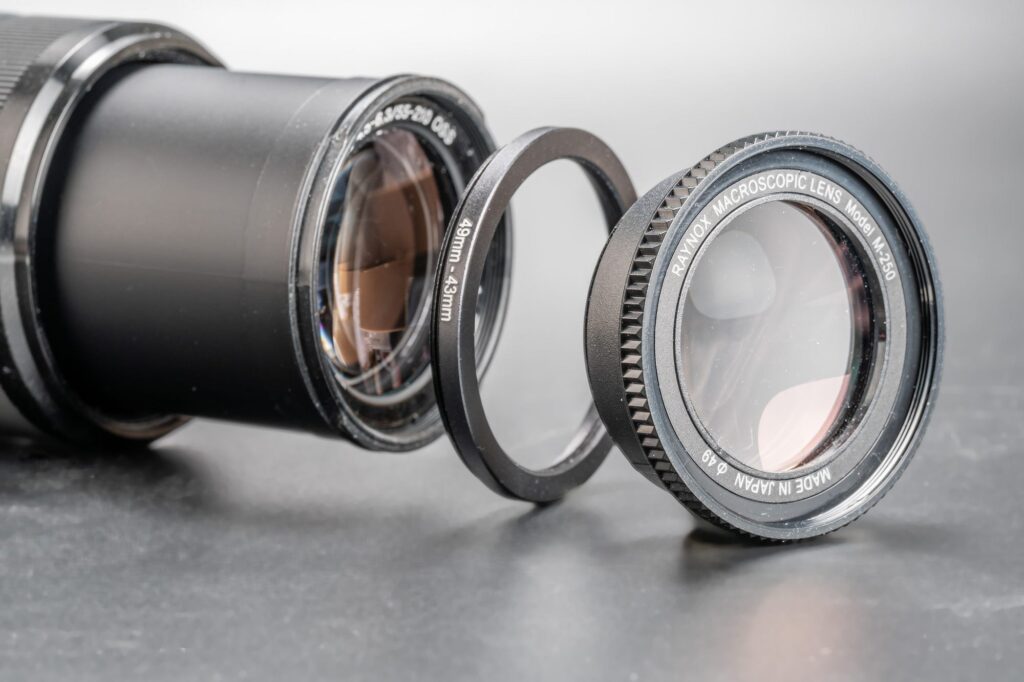
Using the Raynox 250 is very easy. You don’t need any special tools or screws—just clip it onto the front of your existing lens, and it’s ready to go. The best results come when using it with lenses between 50mm and 200mm in focal length. These lenses give you a nice balance of magnification and image quality. If you use a lens wider than 35mm, you might notice dark corners (called vignetting) or blurry edges in your photos. So, it’s best to stick with lenses in the recommended range to enjoy sharp, clear close-up shots.
Choosing the Right Lens to Pair with the Raynox 250!
- Use the Raynox 250 with a 50mm prime lens for sharp and clear close-up shots.
- Pairing the Raynox 250 with an 85mm prime lens also gives beautiful, dreamy background blur.
- A 55-250mm zoom lens works great with the Raynox 250 for shooting small subjects from far away.
- Many people also like using the Raynox 250 with a 70-300mm zoom lens for distance macro photography.
- The Raynox 250 works with lenses that have thread sizes between 52mm and 67mm right out of the box.
- If your lens has a different size, you can use cheap step-up or step-down rings to make it fit.
- These rings are easy to find and only cost a few dollars.
Features of the Raynox 250!
1. Build Quality and Design:
The Raynox 250 is made of high-quality optical glass and solid plastic housing. It feels durable without being heavy. The snap-on mechanism is firm and secure, so you don’t have to worry about it falling off mid-shot.
2. Lens Compatibility:
One of the biggest wins of the Raynox 250 is how many lenses it works with. It comes with a snap-on universal mount that fits filter sizes from 52mm to 67mm—and you can use step-up rings for others.
3. Optical Performance:
The Raynox 250 features high-index coated glass that minimizes distortion and chromatic aberration. Even at the edges, the image clarity is remarkably sharp.
Real-Life Performance!
Even though it can be challenging to take macro photos indoors, the Raynox 250 performs admirably. To get the best results, it helps to use a ring light or a lamp placed at the side. With good lighting, the details in your close-up shots can look amazing. Even small objects or textures can appear super sharp and clear.
The Raynox 250 can capture tiny details you might not even notice with your eyes. If you’re just starting out, try placing your subject near a window during the day to use natural light, which can make your photos even better.
When you go outside, the Raynox 250 really shows what it can do. Whether you’re taking close-ups of insects on leaves or small water drops on spider webs, the lens captures everything with great color and sharpness. It’s perfect for nature photography. However, when you try to take photos of moving subjects like bugs, things can get tricky.
Read: Maximizecache.shop – Your Ultimate Guide to Storage Solutions!
Comparison of Raynox 250 with Other Popular Macro Accessories!
| Feature | Raynox 250 | Canon 500D Close-up Lens | Nikon 6T Close-up Lens | Extension Tubes | Macro Lens (100mm) |
| Magnification | High (up to 2.5x with zoom lens) | Moderate (up to 1.5x) | Moderate (up to 1.5x) | Varies by tube length | 1:1 native |
| Image Quality | Very sharp in center, slight blur on edges | Sharp overall | Sharp overall | Depends on lens + tube combo | Excellent |
| Ease of Use | Very easy – clips onto lens | Screws on lens – easy | Screws on lens – easy | Medium – must remove lens | Easy – standalone lens |
| Portability | Super portable | Portable | Portable | Somewhat bulky | Bulky |
| Price Range | Low (Budget-friendly) | Moderate | Moderate | Low to moderate | High |
| Compatibility | Fits many lenses with adapter | Specific thread sizes | Specific thread sizes | Universal (depends on mount) | Brand and mount specific |
| Best For | Beginners, casual macro shooters | Hobbyists looking for quality | Hobbyists with Nikon gear | Experimenters, budget shooters | Serious macro photographers |
The table shows how the Raynox 250 compares to other macro tools. It stands out for its high magnification, ease of use, and low cost—perfect for beginners or casual users. While more expensive macro lenses offer better overall quality, the Raynox 250 gives great results without the need for a big investment.
Lighting Tips for Macro with Raynox 250!
- Use natural light in the early morning or late afternoon for a soft, golden glow.
- This kind of light is perfect when using the Raynox 250 lens.
- A ring light gives even lighting and helps highlight small details.
- Additionally, a tiny flash with a diffuser can lessen sharp shadows and distribute light evenly.
- Ring lights and flashes are great for taking close-up photos of insects and textures.
- You can make your own soft light at home with simple tools.
- Use a regular flashlight and place white paper over it to soften the light.
- This easy DIY trick works well for macro photography.
- Be creative with lighting—sometimes simple ideas give the best results.
- Good lighting helps bring out details and makes your macro photos look better.
Raynox 250 for Beginners!
If you are new to macro photography, the Raynox 250 is a great lens to begin with. It’s easy to use and works well with most cameras, making it perfect for beginners. Start by practicing on objects that don’t move, like coins, flowers, or everyday household items. These still subjects help you get used to how close you need to be and how to focus properly.
It’s a good way to learn how lighting, focus, and angles can change the look of your photos. Once you feel more comfortable, you can try taking pictures of insects or things that move. But it’s best to build your skills slowly so you don’t get frustrated.
One important thing to remember when using the Raynox 250 is that your hands need to be very steady. Because macro photography captures such small details, even a little shake can blur the photo. A tripod can help keep your camera still and improve the sharpness of your shots.
Best Settings for Raynox 250 Macro Photography!
1. Manual Focus Tips:
Use manual focus to fine-tune your shot. Rock back and forth slowly until your subject snaps into focus.
2. Aperture and Shutter Speed Guide:
Shoot around f/8 to f/11 for sharpness and decent depth. If you want to reduce motion blur, use a quick shutter speed.
3. ISO and Light Control:
Keep ISO low for clean shots. If the light is low, use external lighting or bump up the ISO just enough.
Accessories That Pair Well with the Raynox 250!
- Tripods: A must for sharp shots
- Macro Rails: Fine-tune your focus
- Remote Triggers: Avoid camera shake
Where to Buy the Raynox 250?
If you want to buy the Raynox 250, it’s best to get it from trusted and well-known websites. Good choices include B&H, Amazon, and Adorama. These are reliable places that many people use to buy camera gear. They have a good reputation, and they usually sell original, high-quality products. When you shop on these sites, there is a much lower chance of getting something fake or low-quality. It’s always a smart idea to read reviews, check seller ratings, and make sure the product details match what you are looking for. These steps help you avoid problems and make sure you’re spending your money wisely.
One important thing to remember is that you should always make sure you are buying the original Raynox 250 and not a fake version. Some sellers might offer cheaper versions that look the same but don’t work as well. These knock-offs can break easily, give poor image quality, or not fit your camera properly. To avoid this, look for the official product name and check if it comes with the original packaging. The offer is most likely fraudulent if it looks too good to be true. Sticking to trusted websites and sellers can help you avoid these issues and make sure you get a real Raynox 250 that works great with your camera.
Video Recording with Raynox 250!
1. How It Performs in Video Mode:
The Raynox 250 works great for macro video—though keeping things in focus can be a challenge due to the shallow depth.
2. Best Camera Settings for Macro Video:
Use manual focus, shoot at 60fps, and stabilize your camera. You’ll get silky smooth, close-up videos.
3. Creative Ideas for Macro Videos:
Think insects, water drops falling, match flames, or even fabrics under macro—your creativity is the limit.
Read: Https:// Fintechasia.Net – Exploring The Potential In The Cryptocurrency Space!
FAQs:
1. Can I connect my smartphone to the Raynox 250?
Not directly, but some users get creative with adapters. It’s best used with interchangeable lens cameras.
2. Does the Raynox 250 work with telephoto lenses?
Yes, and it performs exceptionally well with zoom lenses around 100–200mm.
3. What’s the best camera mode for Raynox 250?
You have complete control in manual mode, but aperture priority also functions effectively.
4. Is the Raynox 250 good for insects and flowers?
Absolutely! It’s perfect for tiny details, from bugs to blossoms.
5. How does the Raynox 250 affect autofocus?
It depends on the lens. Some retain autofocus, but manual focus gives better precision.
Conclusion:
The Raynox 250 is an incredible tool that brings macro photography to everyone—whether you’re using a budget DSLR, a mirrorless camera, or just love exploring the tiny world around you. It’s simple, powerful, and a ton of fun. For anyone curious about macro without the cost or complexity, the Raynox 250 is a no-brainer.


Post Comment